
In the classroom | Transportation Theme
Wednesday, September 5, 2012 | 10:45 PM | 0 comments
Hello everyone! I guess we've been on hiatus for quite a long time but we are back here again! With this post, I'd like to share what I've been doing to my kindergarten classroom for the past few weeks. The theme for the previous term was on Transportation so I had the opportunity to doll up my Dramatic Play Centre for the children (:
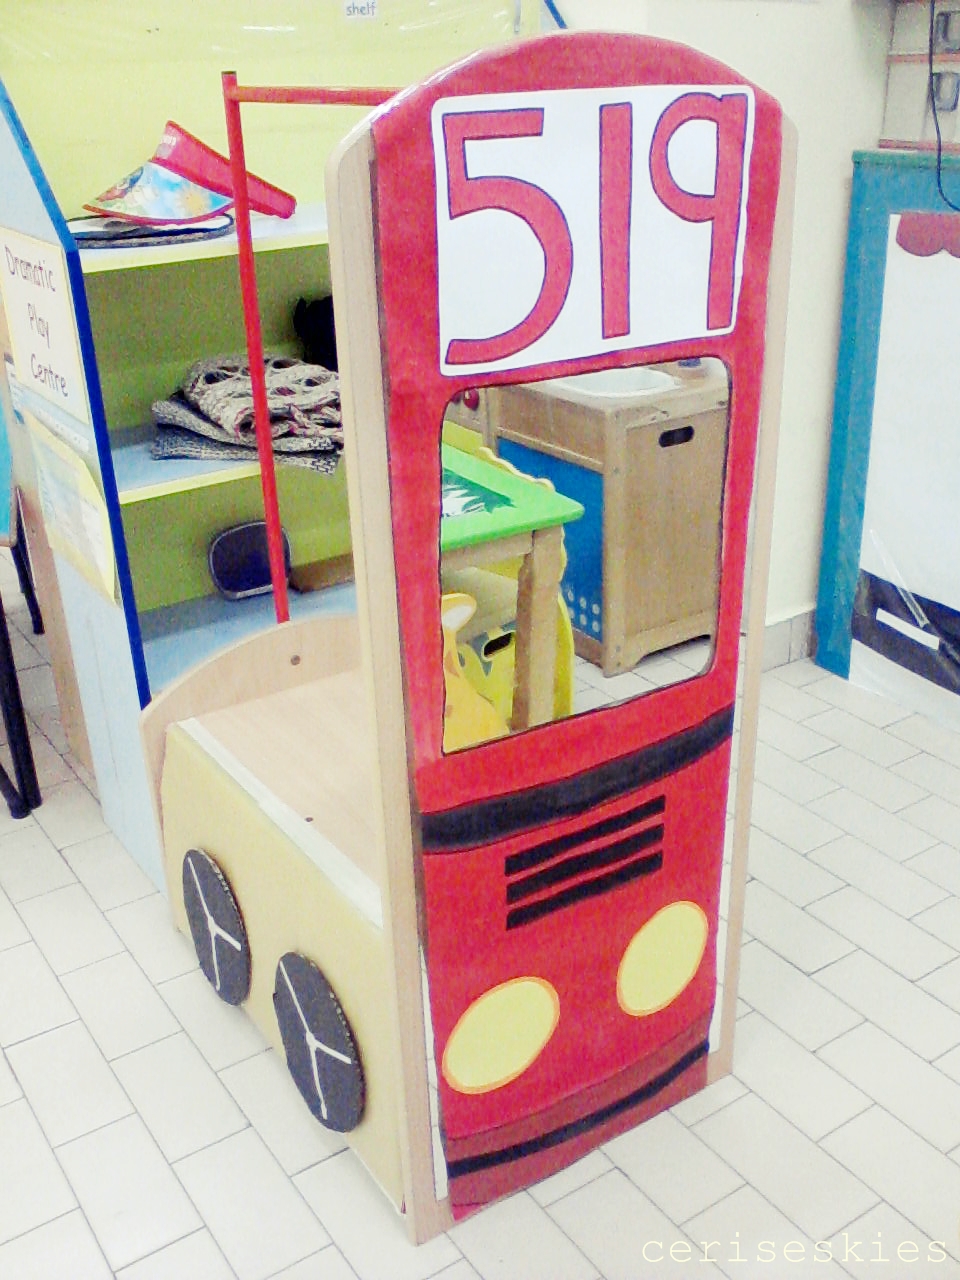

I had an enjoyable time putting up the decorations for my Dramatic Play Centre and I am even more looking forward to dolling it up for next term's theme: Animals!

Last but not least, here's wishing all educators and teachers out there a Happy Teacher's Day!
Teachers plant seeds of knowledge that grow forever. ♥
Love, Syafiah
DIY - crepe paper flowers
Wednesday, July 4, 2012 | 10:37 PM | 0 comments

This month's dramatic corner theme is on plants, and I have decided to set up a flower arranging activity booth for the children to play with. Amidst all the assignments, I did get to spend some time getting crafty!
To make these crepe paper flowers, you'll need
- Martha Stewart crepe paper flowers template (get them here)
- colourful crepe papers
- coloured napkins from IKEA
- green coloured straws (I did not use floral wire for safety reasons)
- green floral tape
Follow the template and instructions provided by Martha Stewart and you'll be fine. Have fun!
Love, Saliha
Labels: diy
More Art Journals
Friday, June 8, 2012 | 3:34 PM | 0 comments


Labels: diy
Fun with Art Journal
Sunday, May 27, 2012 | 2:23 PM | 0 comments
So recently I've started doing art journals during my free time. Some hours spent on pasting, cutting, and rearranging the materials do help me put away all the stress from work. So here are some art journal pieces that I've done and I'd like to share them here. I love how you can just mix and match your materials and resources on a single piece of paper and turn it into a masterpiece ♥


Labels: diy
we need a fix
Saturday, May 26, 2012 | 11:38 PM | 0 comments
Ceriseskies is currently under construction ♥
Fruit Stall
Friday, May 18, 2012 | 9:34 PM | 0 comments
Well this month, the home/dramatic corner theme is on Fruits. I had to transform a portion of the corner into a fruit stall. So Tada!
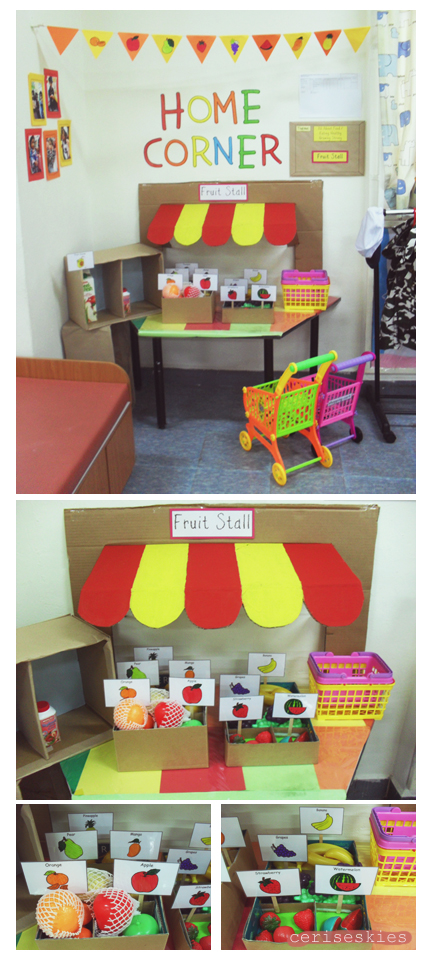
It is far from perfect though. I originally planned it to be a standing stall where children can peer through that window and play pretend to buy and sell. However, there wasn't enough space for that in the home corner and that whole cardboard might fall. I didn't know how to make it steady enough, so yeah, had to place it against the wall instead.
I definitely had fun setting this up and enjoyed hanging the paper buntings. They look kinda cute don't you think? After setting up the stall, I just had to play with it and pretended to do my fruit shopping using those tiny shopping carts. <3
With love, Saliha
Get Inspired | Mother's Day Craft Ideas
Tuesday, May 1, 2012 | 2:16 PM | 0 comments
If you are making something crafty and special for your mother this year, here are some useful links:
Hope these links are helpful to get you started with your bright ideas!
Love, Syafiah
Labels: inspiration, mother's day
Children | Our little heart project
| 1:57 PM | 0 comments
Since Mother's Day is coming, I had my children to do a simple Mother's Day art project of their own! I gave the children a heart template on a drawing paper (size smaller than A5 paper) and had them to write 'I love you!' in the middle of the heart. Next, they had to colour their hearts and I helped them decorate the sides using red crepe paper and UHU glue. Simple isn't it? I'd be putting on straws and ribbons after this - making the whole heart project look like an upsized lollipop! ♥


That's all for now.
Love, Syafiah
Labels: diy, mother's day, work
je t'aime ma mere
| 1:51 PM | 0 comments
Mother's Day is coming! So what are you giving your beloved mother this year? A gift, a lunch or dinner treat, or a super duper special hug for the most super duper special woman in your life? Either way, we are sure they would be lovely especially when it comes from the bottom of your heart. Mother's Day is a great day and a great platform for you to share and express your love and care towards your mother. Throughout your lifetime, they've done plenty of things to make you who you are today and appreciating them on Mother's Day is a fantastic way to let them know you always love them no matter what.
My mother is a poem
I'll never be able to write,
though everything I write
is a poem to my mother.
~Sharon Doubiago
Make everyday of your life a Mother's Day, let your mother know she is always cared about. If you are rather shy, make small and simple gestures such as thanking your mother for preparing your lunchbox for you, giving her a smile whenever you see her, make small talks about what's going on in your life or the world, help her buy groceries or her favourite drinks, help out with the household chores whenever you are free or simply help her with some cooking. These little things go a long way in a mother's heart.
Love, Syafiah
Labels: mother's day
children's portfolio | and so we have been busy
Saturday, April 21, 2012 | 10:30 PM | 0 comments
We apologise for the lack of updates for the past few weeks. There are so many things to share but apparently time is not always by our side. Both of us have been busy with work and projects and as for me, I'm currently working on the children's individual portfolio. So, in preparation for that, I had the children to do a simple cotton-bud painting for their personal artwork folder. I was thinking of saving other more sophisticated artwork ideas for their other terms this year. Below are some of the artworks done by the children!


This girl loves the movie 'Tangled', it's clearly seen in her artwork ♥


And of course, the teacher herself had to fiddle with some paint too hehe!
That's all for now!
Love, Syafiah
DIY Books
Friday, April 20, 2012 | 1:30 AM | 0 comments
We're back. Yes, with our promised DIY Book post!
I was browsing through the resource books in school (my school has an awesome range of creative resource books, really) and I found one interesting book titled 'Step-by-step Making Books'. It became an inspiration for my new personal project that I'm currently making. I've decided to make DIY books for my 3 dearest friends.

Materials used:
- A4 papers (100gsm for the cover page, 70gsm for the other pages)
- Patterned cardstock (UrbanWrite or PaperMarket)
- Alphabet stickers (UrbanWrite or PaperMarket)
- Stationeries (scissors, ruler, glue, pen, etc)
- Thread
- Needle
Read on to learn how to make your very own DIY book.
Labels: diy
Get Inspired | Australian Cardmaking Stamping and Papercraft
Saturday, April 7, 2012 | 9:45 PM | 0 comments
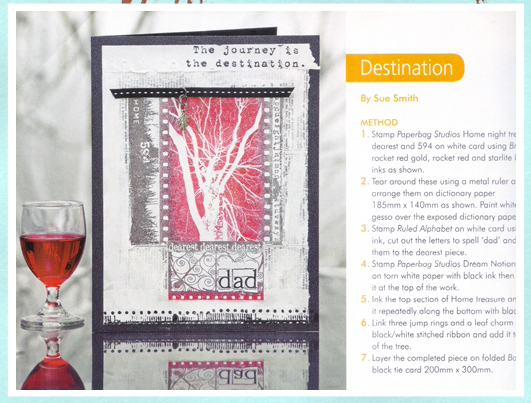
There are plenty of ideas and inspirations on how to make different types of cards in this Australian Cardmaking Stamping and Papercraft magazine. It is friendly and definitely handy for us especially when our friends' birthday season comes on! Browse through some of the designs available in this issue and get inspired. You can get them at your local bookstores or libraries!


PS: We are still working on our own DIY Books and the post itself so do stay tuned!
Love, ceriseskies
Labels: inspiration
coming soon (diy books)
Thursday, April 5, 2012 | 11:12 PM | 0 comments

notebook fetish and polka dots
Saturday, March 31, 2012 | 10:01 PM | 0 comments
Our love for notebooks and diaries is no longer a secret. We had loads of them at home. Some of which are still empty, untouched, kept in a corner to be admired! Hah! I strongly believed that we've actually adored having notebooks since we were young. I remembered giving notebooks as presents to friends back when I was much younger and even till now. I just love giving people things they can write on. Notebooks are essential beloved belongings, so dear, so true ♥
 |
It was a birthday gift from my dearest friends. The fact that they knew the amount of love I have for notebooks is admirable. Well this notebook is really cute and small. It consists of 120 sheets and 3 dividers.
You can get this from Daiso.
Black 365 diary
A wonderful birthday gift from Syafiah. If you noticed, she owns the red 365 diary. I should say that this is the most chic looking diary I've ever own. Previous years' diaries were all simple and inexpensive ruled notebooks. This has more than 365 pages though. I think its about 368 pages. It's a plain, no lines diary, so yeah, you gotta have to keep your handwriting neat and straight (: You can get this from kikki.K.
2. 12 Monthly scheduler
I personally love the colour. This scheduler consists of 12 sets of schedule calendar and there is another section specially for notes. It has quite a lot of pages so there is plenty of space for you to dress it with your creativity and I loved it. Pretty neat. I pasted photos and quotes all over in a monthly manner. It also has the last page for you to fill up your personal data.
You can get this from Artbox.
Brown plain notebook
It's a plain notebook with no lines. I used this for my doodles before I bought a moleskine. I like the texture of the papers. It's about 48 pages.
You can get this from UrbanWrite and { prologue }.
3. Star Wars Limited edition plain moleskine
Gotta love this one. I bought this as a gift for myself. Yeah. It even has a star wars poster inside. I used this for doodling and writing my thoughts. It's really nice and it has a lot of pages.
You can find this at UrbanWrite. May the force be with you.
4. Polka dot pencil case
This is a freebie. My dad bought HL milk cartons and got this as a freebie. Cool huh? (: He gave it to me because he wouldn't want that for a pencilcase wouldn't he? Haha. I love the colour and it's definitely one of the adorable free items I have ever gotten.
Till the next post.
Love, Saliha
Designing your own memoboard
Friday, March 30, 2012 | 5:39 PM | 0 comments
Inspiring and motivational quotes always make us feel more confident about ourselves and our capabilities as a human being. Quotes and sayings also serve as a reminder for us on our roles as beings on this Earth and what we must do to not only get away with problems but also get through them. A good way to have these quotes in our constant remembrance would be by putting them on a memoboard, somewhere you can visually see them every single day.
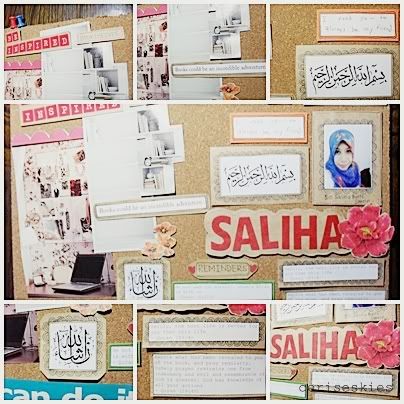
For this post, my sister and I would like to share what we did with our memoboards and we will include some simple tips to start making and designing your own!
Memoboards not only hold favourite or memorable quotes. Of course you can add small memos, to-do-lists, your monthly schedules, polaroids and pictures of your loved ones. Here are our personal memoboards!

Materials used:
- Memoboard (framed/frameless)
- Personal picture (printed on 190gsm paper)
- Images (Tumblr, IKEA cataloque book, Google)
- Quotes we love (from Google and Tumblr)
- Scrapbooking papers (from UrbanWrite Singapore)
- Alphabet and number stickers (from UrbanWrite Singapore)
A few tips on making your own memoboard:
- If you don't like things messy, draft out your own memoboard plan. Mark out which are the areas that you would like to place your individual items.
- Plan out a colour theme if you would like. It'd look nicer and less noisy.
- Get your materials ready before you start on your memoboard. Designing your memoboard may take more than an hour - depending on a lot of circumstances - and it'd be great to spend a single stretch of time to do your board until its completion. The sense of accomplishment once you put up your board is definitely amazing.
- Turn on some of your favourite music while you are designing your memoboard. It adds some hype and keeps your excitement up high! (This can be a tough work especially when things go wrong along the way.)
- Let your mind flow throughout the process. Sometimes the draft that you crafted earlier on may not suit the materials that you have. Always open your mind to alter the angle of your materials and shift them across or anywhere on your board. Who knows, impromptu work can be marvelous at times!
- The memoboard is your own personal masterpiece. So it should represent who you are as a person as well as your personality. Obviously there is never a right or wrong design for your own memoboard. Set yourself free, don't stress up and enjoy every minute of your efforts!
- Lastly, always be inspired!
Other lovely memoboard ideas you can try. Enjoy!
Love, ceriseskies
Labels: diy, memoboards
